Cue "Pomp and Circumstance." Yes, it's that time of year again. Stacy's son and my son go to the same preschool, and today was their last day of school. Since there wasn't a formal graduation ceremony, one cute mom took it upon herself to plan a wonderful program, complete with little felt graduation caps. I believe she bought them from Oriental Trading Company, but when we saw them we thought, like we always do, "we could makes those!" And now you can, too. This size was perfect for our five-year-olds, but it also fit Stacy's little one and ME! The elastic is the key.
Felt Graduation Cap Tutorial
What you'll need:
*Felt (about 22" by 22")
*Needle and thread
*Small piece of elastic, about 1 inch long
*Sewing machine
*Embroidery floss or yarn
*Piece of light cardboard or heavy card stock (see link to video for more information)
1. Cut two pieces of felt that are 9 inches by 9 inches. Cut one piece of felt that is 2 ½ inches by 22 inches.

2. Sew the long band (2 ½ inches by 22 inches) together at the short side using a ¼ inch seam Turn inside out so the seam is on the inside of the band
3. Fold one of the 9 x9 squares in half to make a triangle and again to make a smaller triangle.


4. Measure 3 inches from the point of the triangle and make a mark on one side, again in the middle, and again on the other side of the triangle. Cut out the center of the triangle in an ice cream cone shape using your 3 inch marks as a guide


5. Pin the square piece with the circle cut out to the band. Sew together using a ¼ inch seam.


6. Place the whole square piece on top of the hat and sew all four sides together. Please note that I accidentally left my seam on the outside in this picture. Don’t do that or you will be able to see the seam. It should be on the inside of the hat.


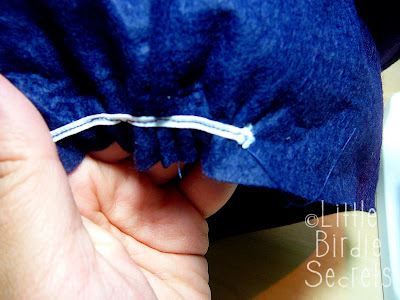
7. Cut a piece of elastic about 1 inch long. Sew this to the inside of the hat over the seam. As you sew, pull the elastic as tight as possible. Really stretch it out. You want it to bunch back up when you are done sewing. This will help the hat stay on.


8. Make a tassel using your floss or yarn and piece of cardboard. You can use this great video tutorial (or watch it here) if you need help.
9. Using needle and thread, sew your tassel to the top center of the hat.

Congratulations Class of 2009!!!

share this on » |
{Facebook} | {Twitter} | {Pinterest} |


15 Responses to “how to make a graduation cap”
Cute! Sure beats the ones we made for our preschoolers using chinet bowls and cardboard squares!
Love it! The grad hat is so adorable!
Darling! I am amazed at all you can do!!! (And now me, too!)
Hello! I am happy to say that I heart your blog and I am awarding you the One Lovely Blog Award! Stop by my blog for the details:)
http://favorswithlove.blogspot.com/
I love this idea!! I posted a link to your tutorial on Craft Gossip (sewing): http://sewing.craftgossip.com/tutorial-graduation-caps-for-your-little-ones/2009/05/15/
--Anne
VERY GREAT IDEA!! i just admire your blog! i check it at least 3 times a day! i've made almost everything you've done. i need to get going on my denim picnic blanket!! and it made me happy all week that you actually checked out my blog and even left a comment on something little ol' me made!! lol.
So cute!
Oh, how cute! Thanks for the tutorial.
Perfect! I was looking for something like this, although I plan on making mine so that it is a "box" to put the grads gift in. This will work perfect, THanks!!!
Thanks, this was helpful. I needed to make a "Prof. Plum" hat for an upcoming "Clue" birthday party!
Thanks a bunch!! Just made one of these in a few minutes for our daughter. I used some pink fleece and it turned out wonderful!!!:)
Mindblowing and so accurately put up .. gee .. :) thx !!
I was totally gonna make some graduation caps out of poster board for my daughters small class but these are WAY cuter!! Thanks for the tutorial!
These turned out great! Thanks for sharing. I ended up putting cute buttons on the top of mine to cover up where the tassel attaches.
Thanks for this tutorial! I just made 6 of them, and they turned out great. I did end up using a longer pieces of elastic though. It was so easy!
Post a Comment